- Poetmistry - Sound Design & Ableton Tricks
- Posts
- How to Death Grips + My Stems!
How to Death Grips + My Stems!
Plus an underrated free sample library and some early 2000s "indietronica"
poetmistry
January 21, 2026

Hello my friends!
I am currently staring out the window watching a bluejay flutter around in the snow. As a “melanated individual,” this time of year can really get me down, but watching the snow come down on a random Tuesday is some recompense!
Anyway, if you’re looking for some winter whimsy with heavy sound design flavor, I hope you’ll check out my new release strawberry in hell. This is the second single from my new album STRAWBERRY (which comes out in TWO WEEKS). I found this old “fire and brimstone” type church VHS and made that into a little video.
strawberry in hell stems
Check out the stems here. I’ve included a fairly “raw” Ableton project file that you’ll be able access if you have Ableton 12.1.1 or higher. I tried not to clean it up too much so you’ll see lots of deactivated clips where I was considering adding additional sounds. I’ve also included a folder with a rendered out version of all the individual tracks so you can open that up in any DAW and go wild with it!
Tutorial: Let’s get Death Grippy with it!
The more that I’ve been learning about Death Grips, the more I’m realizing that they are some real “Ableton power users.” They do a lot with Ableton warp modes as well as Ableton presets (never sleep on Ableton stock instrument presets!!) Here are two quick tips for making some of the weirder and glitchier sounds that show up in their tracks.
Tip #1: The Most Disgusting Warp Mode
I would recommend starting with something simple like a snare or 808. Double click on your clip and in the Audio Utilities menu at the bottom make sure that warp is turned on (it should be yellow). Change the warp mode to “Texture” in the dropdown menu, then turn “Grain Size” and “Flux” all the way down.
On its own, this won’t do anything. We need to engage time stretching by either stretching the sample out or change the pitch. I like to do this by turning up the clip “BPM” (see below, I’m not the global bpm of the whole track), but you can also hit “x2” or change the pitch of the sample. Don’t be afraid to really push that BPM up to almost 999 especially if you’re dealing with a short sample. You should get a really shrill, grating electronic sound that’s quite different from the original.

Now if you really want to get crazy with it, try this out. First add a ton of distortion to the sample (I’m talking at least 3 or 4 instances of Ableton amp or OTT). Then set up a new audio track for resampling and while you’re recording, double click on your distorted warped clip and randomly move around the clip “BPM” we talked about above. This allows you to record the little glitches and artifacts you get as you stretch out the audio. I hope this little gif makes it clear. The pink “Snare Chop” clip is changing length because I’m manipulating the clip BPM in the bottom left of the screen. The orange clip is just a recording of what I’m doing to the snare sound. You should be able to get some really cool sounds from this!

Tip #2: Break the Shifter Window
The one problem with tip #1 is that it only works with audio. How can we apply some timestretching fun to a software instrument? Ableton Shifter!
First, grab a stock Ableton bass sound. I would recommend something like Basic Saturated Bass or Basic Analog Bass. Just to be safe, I would add an Ableton amp too. Then add an Ableton Shifter and turn the “Coarse” up to 12 st (I found this worked better when shifting up than shifting down). Now play some extra low notes and as you do, mess around with Shifter’s “window” parameter. You should get lots of different tones especially at lower values. As you’re trying different values, also experiment with moving the Ableton amp before or after (or both).
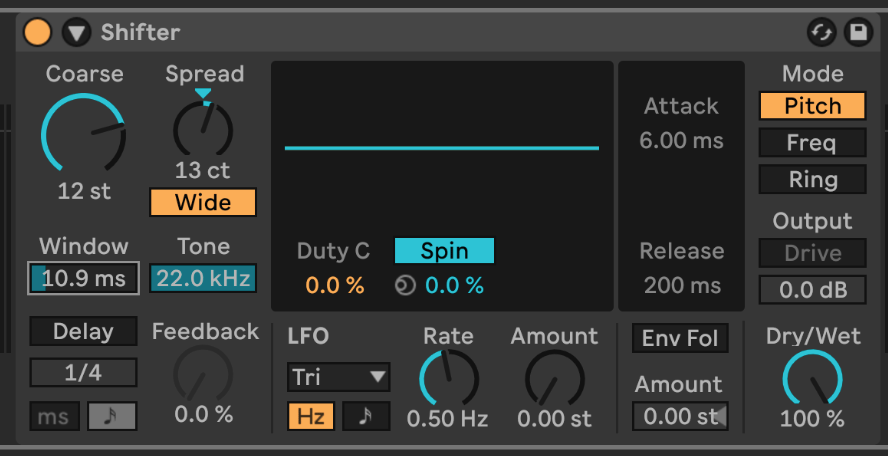
Three little bonus tips. First, you can add some stereo width by clicking the “wide” button and turning that knob up a tiny bit. Second, you can reduce any unwanted high frequencies by turning down the “Tone” parameter. Finally, you’ll notice that there are some really fun little glitchy sounds that occur when you change the “Window” parameter while you’re playing something. Once again, I encourage you to resample on a new audio track to capture some of these interesting sounds!
If you want to learn a few more “Death Grippy” techniques, check out my video on Youtube.
Sound Resources: pianobook
Recently, I was trying to find some samples of a piano being destroyed, which led me to some great YouTube videos. So my first suggestion is to go download some of those videos and chop them up to get your own piano destruction sounds. However, this search ended up reacquainting me with Pianobook, which has free sample libraries of everything from old pianos to NASA satellites formatted for the free Decent Sampler plugin. I’ll be totally honest, I haven’t downloaded Decent Sampler, but I’ll still download libraries from Pianobook and just use the sound files. For example, I took these recordings of a Medium Format Camera and just dragged all the files into an Ableton drum rack. Obviously that wouldn’t work quite as well with something melodic, but you could always throw sounds into the Ableton sampler or just manipulate the audio itself. Go check it out. There’s some fun oddball stuff in there as well as some recordings of very obscure acoustic and electronic instruments.
Music Recs: Figurine - The Heartfelt
Following up on my Ear suggestion from a few weeks ago, I’m throwing it back to some early 2000s laptop indie…or whatever it’s called…indietronica, idm pop, etc. To be more specific, I’m talking about bands like Lali Puna, Sweet Trip, The Notwist, Ms John Soda, Múm, Styrofoam etc. I’ve been particularly enjoying The Heartfelt by Figurine which is on the more dance-y end of the spectrum, but with the requisite electronic bloops and bleeps to keep me happy. Once again, sorry to those who were expecting sound design deep cuts. It’s dark and cold, and we’re doing feel good music!